Installation Instructions – GRC Cable Pits
Every project is unique and some require more detailed instructions and possibly changes to the information provided on this website. Below you’ll find ‘standard’ installations for reference.
Installers must observe the relevant codes of practice and standards legislated. We recommend contractors contact ‘Dial Before You Dig’ on 1100 or at www.1100.com.au. Site conditions may require additional reinforcement or a change to these details that may need to be provided by an engineer.
Instructions
Quick Knock
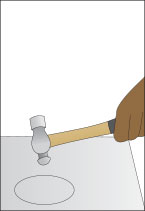
One entry
GR Concrete pits don’t have a knockout, leaving you to choose where the entries are to go as well as the size and number of entries on each side. Simply mark out where the entry is to be made and starting in the centre, softly tap the pit with a ball pein hammer.
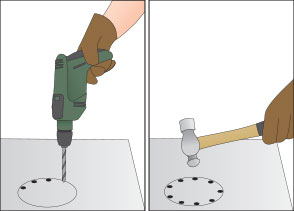
Multiple entries
Alternatively, for larger entries (150mm), once you’ve marked out the hole required, use a masonry drill to drill at 50mm centres.
Notes
- Prior to the installation, determine the exact positions of your conduit entries.
- Holes may be carefully formed using a drill, hammer or grinder with masonry disc.
- Pits to be installed to levels as shown or directed by the appropriate authority.
- Excavation for the pit shall be dug to neat lines from naturally compacted ground and to the necessary depth. If any soft or unsuitable material is encountered, it shall be removed and the bearing surface under the pit shall be compacted and levelled to the required dimensions. A layer of compacted granular material shall be provided under the pit to ensure support, which will not yield or deflect when the pit is in service.
- All connections to pits should be in accordance with the directives of the appropriate authorities and Australian Standard AS2500.
- Extension riser joints (and concrete surrounds) are to be sealed with an approved epoxy cement mortar, to make a strong watertight joint.
- It is required that you take extra measures to ensure the permanency of your installation in rock. To prevent pits from lifting or ‘floating’, as a minimum it is necessary to backfill to the top of the rock excavation with a composite of 4:1 sand/cement mix.
- The pit should be bedded on a minimum 50mm layer of sand-cement mortar – 4 parts sand, one part cement – back filling to the top of the conduit or a minimum of 300mm on all sides with the same cement mortar. Further backfill to the top of the pit with granular material, compacted incrementally.
- Compaction should not take place without the cover being fixed (with epoxy) to the pit. In the absence of a cover, pits may be braced in both directions to prevent deflections during compaction.
- Mascot GR Concrete pits have a maximum approved depth of 5000mm, however we require you to provide stabilised backfill where the overall pit depth is in excess of 1800mm. In this event, it is required that you backfill the pit with 4:1 sand/cement mix so that the unsupported height of the pit wall is no greater than 1800mm. For example, on a 4000mm deep pit, the minimum backfill height is 2200mm from the external base of the pit.
- Before attempting any above ground installations or when dealing with water charged ground, please consult your nearest Mascot Sales Office for more details.
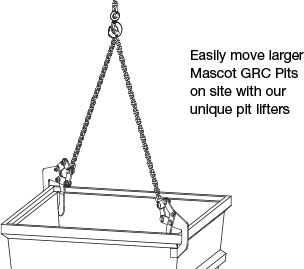
Lifting Mascot GRC Pits on Site
Lifting larger Mascot Pits on site is easy with our specifically designed Pit Lifter.
Manufactured from grade 250 steel plate and tested to safe working loads of 1000kg and 500kg (depending on style), Mascot Pit Lifters are the right tool to safely and effectively lift Mascot Pits.
Engineer Design Certificate # 11081.
Click here for information and instructions on using Mascot Pit Lifters.
For further information on installing Mascot GRC Pits, please contact our technical team on 1300 885 295.